You are using an out of date browser. It may not display this or other websites correctly.
You should upgrade or use an alternative browser.
You should upgrade or use an alternative browser.
Tamagotchi P's Heart Caps
- Thread starter ISmileBecauseImStrange
- Start date


Help Support TamaTalk:
This site may earn a commission from merchant affiliate
links, including eBay, Amazon, and others.
- Status
- Not open for further replies.
SupahCow090
Well-known member
- Joined
- Jan 11, 2013
- Messages
- 499
- Reaction score
- 364
Wow.  This is plain awesomeness. You deserve a medal, ma'am.
This is plain awesomeness. You deserve a medal, ma'am.♥Twilightchi♥
Well-known member
The black one is AMAZING. Like uhh-May-zing. I need it! XD
ISmileBecauseImStrange
Well-known member
Thankyou all for the positive feedback!! Greatly appreciated!
Right small update for you all!
I tried to make some casts using the silicone I used to make the moulds and I also tried to colour the silicone too!
It seems to have somewhat work, unfortunately the colour is coming out the silicone so shall try colouring with something else next time. I didn't really think it though using food colour.. why did I use that and not something else.. silly me, tisk tisk! *slaps wrist*
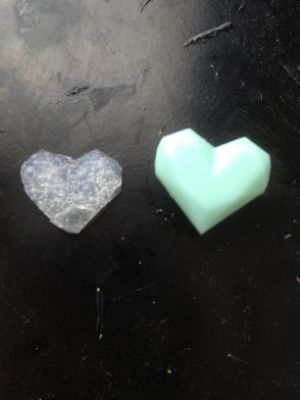
So here are the pictures of the "purple" I also should have known from using purple in cake making, it comes out like a grey sludgy colour. Genius move. xD
Next time I will try with glitters
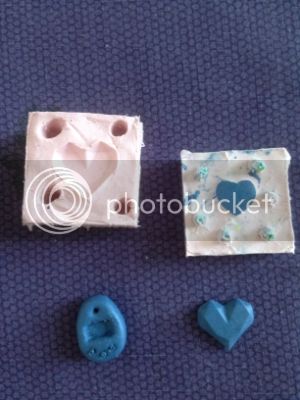
Thankyou for watching!
Greatly appreciated!Right small update for you all!
I tried to make some casts using the silicone I used to make the moulds and I also tried to colour the silicone too!
It seems to have somewhat work, unfortunately the colour is coming out the silicone so shall try colouring with something else next time. I didn't really think it though using food colour.. why did I use that and not something else.. silly me, tisk tisk! *slaps wrist*
So here are the pictures of the "purple" I also should have known from using purple in cake making, it comes out like a grey sludgy colour. Genius move. xD
Next time I will try with glitters


Thankyou for watching!
ISmileBecauseImStrange
Well-known member
Right trial two with the silicone.
Im making it the same way I made the resin versions so I know this mould should work hooray!!
Gosh this is messy! I need a bigger design room I swear! xD Im using an IKEA tiny tiny side table, I have no space xD So I apologise if you see all sortsa stuff in the background!
Would be tempted to see if I can make and change the colour of the buttons next would love full glitter ones
Will upload a picture tomorrow of the pulled piece
ISBIS
Im making it the same way I made the resin versions so I know this mould should work hooray!!
Gosh this is messy! I need a bigger design room I swear! xD Im using an IKEA tiny tiny side table, I have no space xD So I apologise if you see all sortsa stuff in the background!

Would be tempted to see if I can make and change the colour of the buttons next
would love full glitter ones Will upload a picture tomorrow of the pulled piece
ISBIS
ISmileBecauseImStrange
Well-known member
Hellooooh!
Right small update, like I promised.
The piece pulled amazingly well from the mould (Such a relief that I wouldn't have to make another one )
Just got to wait for it to dry off a little bit longer before I'll test it. But here are the squidgey results :
Tadaaaah!!
Im sooo curious if anyone has a broken P's that I could take it apart and make a new colour shell.. I would love to have a pastel orange after making this cap, it would be awesome!
Thankyou for watching!
ISBIS
Right small update, like I promised.
The piece pulled amazingly well from the mould (Such a relief that I wouldn't have to make another one
)Just got to wait for it to dry off a little bit longer before I'll test it. But here are the squidgey results
:


Tadaaaah!!
Im sooo curious if anyone has a broken P's that I could take it apart and make a new colour shell.. I would love to have a pastel orange after making this cap, it would be awesome!
Thankyou for watching!
ISBIS
SailorRosette
Well-known member
You want to make a shell? Have you considered using styrofoam? Like the green stuff they use for the base of plastic flowers? Just shove it into that in a plastic bag. Then you could carve another with foam or cut a plastic easter egg and sorta shape that... They sometimes have egg shaped styrofoam in art stores. Just consider you may have to cover the foam wi plastic so it doesn't soak into the foam.
Eternal Mametchi Fan
Well-known member
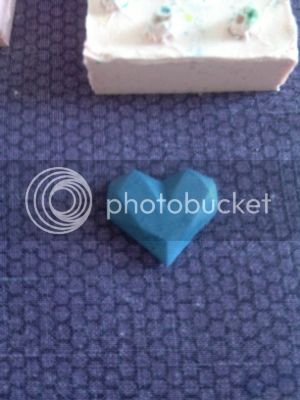
The dark blue heart is my favorite out of the ones you made! Nice work
ISmileBecauseImStrange
Well-known member
Hello there!!
Sorry I haven't been on here in a long long time!
Been busy working, and doing driving lessons and researching new silicones.
WELL!
I have managed to locate a different silicone than I have been using that is meant to set harder than
my current stuff, so I am trialling that as I type now, it is also clear so I will be placing bits inside it hopefully
after is starts to cure.
Not sure on curing time with this lot, hoping it is about 4-6 hours so its fairly quick to make them.
Ive just got a clear cast going now, shall experiment with food colours, acrylic paints, glitter, eye shadows and nail caviar stuff.
Will update tomorrow after work after everything has cured!
See y'all then!
ISmileBecauseImStrange
Well-known member
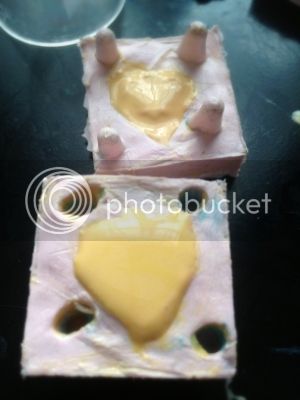
Okay update time!
So! I've given it a go with the clear silicone the other day, and for some reason it took ages to "cure" I managed to pull it from its mould but it still hasn't
set, even now! BOO! (thats about 32 hours)
Mmmm gelatinous blob!!
I've decided to give it another go, I think I put the two halves together too soon so the silicone couldn't air dry properly. So this time I waited 'till they were slightly tacky
and combine them and put it in a clamp to make sure its properly together.
Fingers crossed by tomorrow morning Ill have a complete unit, or I'm going to have to think of something new to do. I am so darn determined now to get these done!!!
So for now,
Thankyou for watching!
So! I've given it a go with the clear silicone the other day, and for some reason it took ages to "cure" I managed to pull it from its mould but it still hasn't
set, even now! BOO! (thats about 32 hours)


Mmmm gelatinous blob!!
I've decided to give it another go, I think I put the two halves together too soon so the silicone couldn't air dry properly. So this time I waited 'till they were slightly tacky
and combine them and put it in a clamp to make sure its properly together.
Fingers crossed by tomorrow morning Ill have a complete unit, or I'm going to have to think of something new to do. I am so darn determined now to get these done!!!
So for now,
Thankyou for watching!
Last edited by a moderator:
ISmileBecauseImStrange
Well-known member
Hello hello!
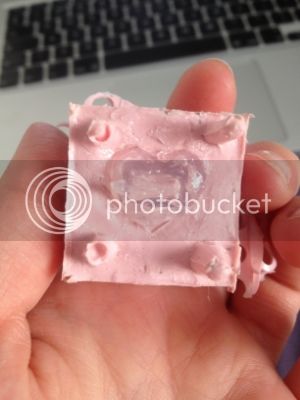
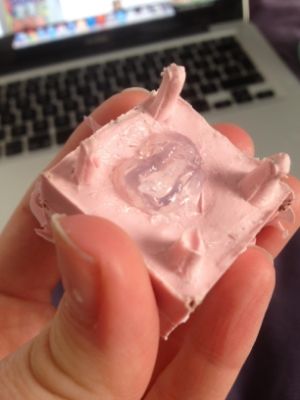
Right minor update time!
I decided against using the pink moulds for some reason my new silicone doesn't like the old silicone I use to make moulds
so I've had to start completely from scratch, and use the new silicone to make a new mould! Thankfully I had enough scrap
silicone from a previous pour to make a demo mould (just to see if it would work)
After about 12 hours it had formed a good skin and was ready to be pulled from the mould!
..Problem.. pouring the same silicone into a mould without any barrier inbetween results in the silicone curing to itself
Thankfully after careful prodding and poking and praying, I managed to get the item out!
However I only did the heart bit, none of the part that actually goes into the tama, so that will be whole new problem I recon when I
come to make it!
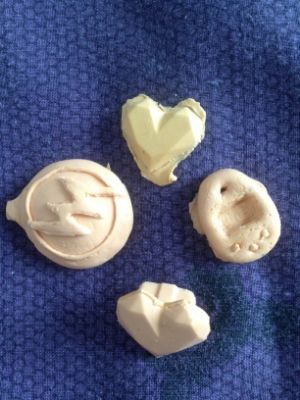
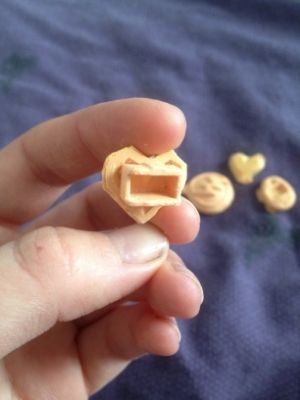
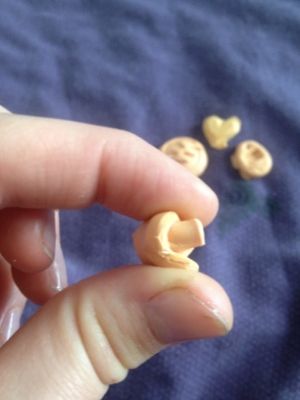
Unfortunately, I have somehow long over the course of the day, the mould I used, so for now theres no picture of that,
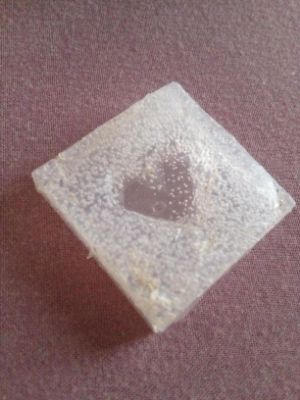
but I do have a picture of the little heart (unfortunately, I need to de bubble it next time better, only did it this quickly as a trial)
**Oops found it! It was hiding under my just made bed xD Thats the trouble with it being clear!!)**
But for now heres a crummy picture of the heart;
And the mould;
Thankyou for reading!!
ISBIS x
Right minor update time!
I decided against using the pink moulds for some reason my new silicone doesn't like the old silicone I use to make moulds
so I've had to start completely from scratch, and use the new silicone to make a new mould! Thankfully I had enough scrap
silicone from a previous pour to make a demo mould (just to see if it would work)
After about 12 hours it had formed a good skin and was ready to be pulled from the mould!
..Problem.. pouring the same silicone into a mould without any barrier inbetween results in the silicone curing to itself
Thankfully after careful prodding and poking and praying, I managed to get the item out!
However I only did the heart bit, none of the part that actually goes into the tama, so that will be whole new problem I recon when I
come to make it!
Unfortunately, I have somehow long over the course of the day, the mould I used, so for now theres no picture of that,
but I do have a picture of the little heart (unfortunately, I need to de bubble it next time better, only did it this quickly as a trial)
**Oops found it! It was hiding under my just made bed xD Thats the trouble with it being clear!!)**
But for now heres a crummy picture of the heart;

And the mould;

Thankyou for reading!!
ISBIS x
ISmileBecauseImStrange
Well-known member
Hello hello!!
Sorry for not really updating this very much!
Been in inventing mode, trying to suss out a magical formula to get these ruddy caps working!!
Well!
Ive temporarily given up with making silicone moulds as I've annoyingly managed to tear my real silicone heart that came with
my P's in half so until I can fix that, I cant make any moulds. (BOOOO!!!)
However, due to curiosity, I thought I would retry my resin hearts I made previously, as I don't particularly want the chip exposed in my P's
whilst I figure this all out.
I gave it a wee wiggle, and hey presto! It fits! Weird aye? The things I made right at the beginning worked!
Well.. I say worked.. I wedged it in, it is rather stiff to get in and our so I will sand down the sides and make sure it is a nice fit and wont get stuck on my Tama.
So below are the pictures of my purple, sparkley glow-in-the-dark cap in action (yet to be sanded)


Once I have got this to fit nicely, I shall make yet another mould to get this darn thing perfected, Im hoping after this one, It should have been solved and I can use either silicone or resin to make them.. could experiment and combine the silicone and resin together.. hmm.. nono.. wont work.. or maybe.. okay I'll stop day dreaming now and get back to sanding!
Will keep this updated as Im quite excited with the results!
ISBIS
xx
ISmileBecauseImStrange
Well-known member
I have tried to make some characters into the cap, my picture was one attempt, unfortunately I made Turtletchi too thick so it sits too far forward and it looks too awkwardI recommend you try making tamagotchi characters one , first draw and ya.... I know it is hard but it fun!
Will try again when I have more time
ISmileBecauseImStrange
Well-known member
Hello all!
Right I think I have got this cap thing sorted now, not in the material I wanted, but hey ho!
Im using resin, so its pretty customisable, however it does dry pretty hard, so it wouldn't be a one for one replacement cap
to the one that comes as standard in the P's however its a great alternative!
You'll hear it click into place as you put it in, and give it a wee wiggle and it pops back out again!
So!
If anyone would like to have their own custom cap, drop me a message and we can work out a deal!
Thankyou for watching!
ISBIS xx
- Status
- Not open for further replies.